12 Creative Portrait Photography Ideas
We share twelve portrait ideas we actually use in our London studios, from switching lighting styles and colour palettes to trying new locations, varied shot types, silhouettes, and motion blur, plus simple post production tweaks and gear experiments to keep your portraits fresh.

Reviewed by Jack Freegard, Managing Director & Professional Photographer at TYX – Updated 8 November 2025
Drawn from daily client work and test days at London photography studios, this guide distils the tweaks that consistently lift portraits, lighting shifts, small styling changes, and fast fixes you can use anywhere.
How to use these portrait ideas
When portraits start to feel samey, you do not need a reset, just a nudge. These ideas are small switches we reach for on real shoots, change the light, try a colour, move a step, or shift your angle, and the mood changes fast. Use whatever you have, window light or a lamp, set white balance or shoot RAW, phone or camera.
Pick one idea, try it for five minutes, shoot three to five frames at 1/125 s or faster, look at the frame together, then either lean in or swap to the next thing. Tap to focus on the eye and lock exposure, keep it playful, keep it moving, let the pictures tell you where to go.

Note: Try and keep costs down when experimenting. Instead of using professional models, use family members for a family photoshoot.
1. Experiment with different lighting
Lighting changes the feel of a portrait fast. Softer, brighter setups often read open and upbeat, harder or lower key setups can feel tense or moody. Colour matters too, warmer light can feel inviting, cooler light can feel calm or distant. These are guides, not rules, test and trust what you see. High key means bright, low contrast, minimal shadow across the frame, low key means darker, higher contrast, deeper shadows. You can use any of the face lighting patterns below in either look.
Try these classic patterns
- Split lighting: Light from the side so one half of the face is lit and the other falls to shadow. Strong, graphic, great for drama.
- Broad lighting: Light the side of the face closest to camera. Makes the face look a touch wider, flattering for narrow faces.
- Short lighting: Light the side of the face furthest from camera. Adds depth and a slimming shape, flattering for most portraits.
- Butterfly lighting: Place the key above and centred over the lens to create a small butterfly shadow under the nose, often paired with a lower fill for clamshell lighting. Accentuates cheekbones and symmetry.
Studio tweaks that make a big difference
- Raise or lower the key by 10 to 20 cm to change how cheekbones and eye sockets read.
- Move the light closer for softer wrap, further for crisper shadow edges.
- Swap modifiers, big softbox for soft, beauty dish for punch, grids to control spill.
Outdoors, work the natural light
- Shoot at different times, early or late for soft direction, midday in open shade for even skin.
- Use a reflector to lift shadows, or a diffuser to soften harsh sun.
- Mind colour, open shade runs cool, add a warm card or gel if needed.
2. Use different colour palettes and filters
Colour changes the temperature of a portrait almost before you notice your settings have moved. A shift toward brighter, softer tones often reads open and upbeat, while a moodier, lower key treatment deepens shadow and slows everything down.
Either feel can live happily with any face-lighting pattern, so the game is less about rules and more about steering the atmosphere.
Black and white photography
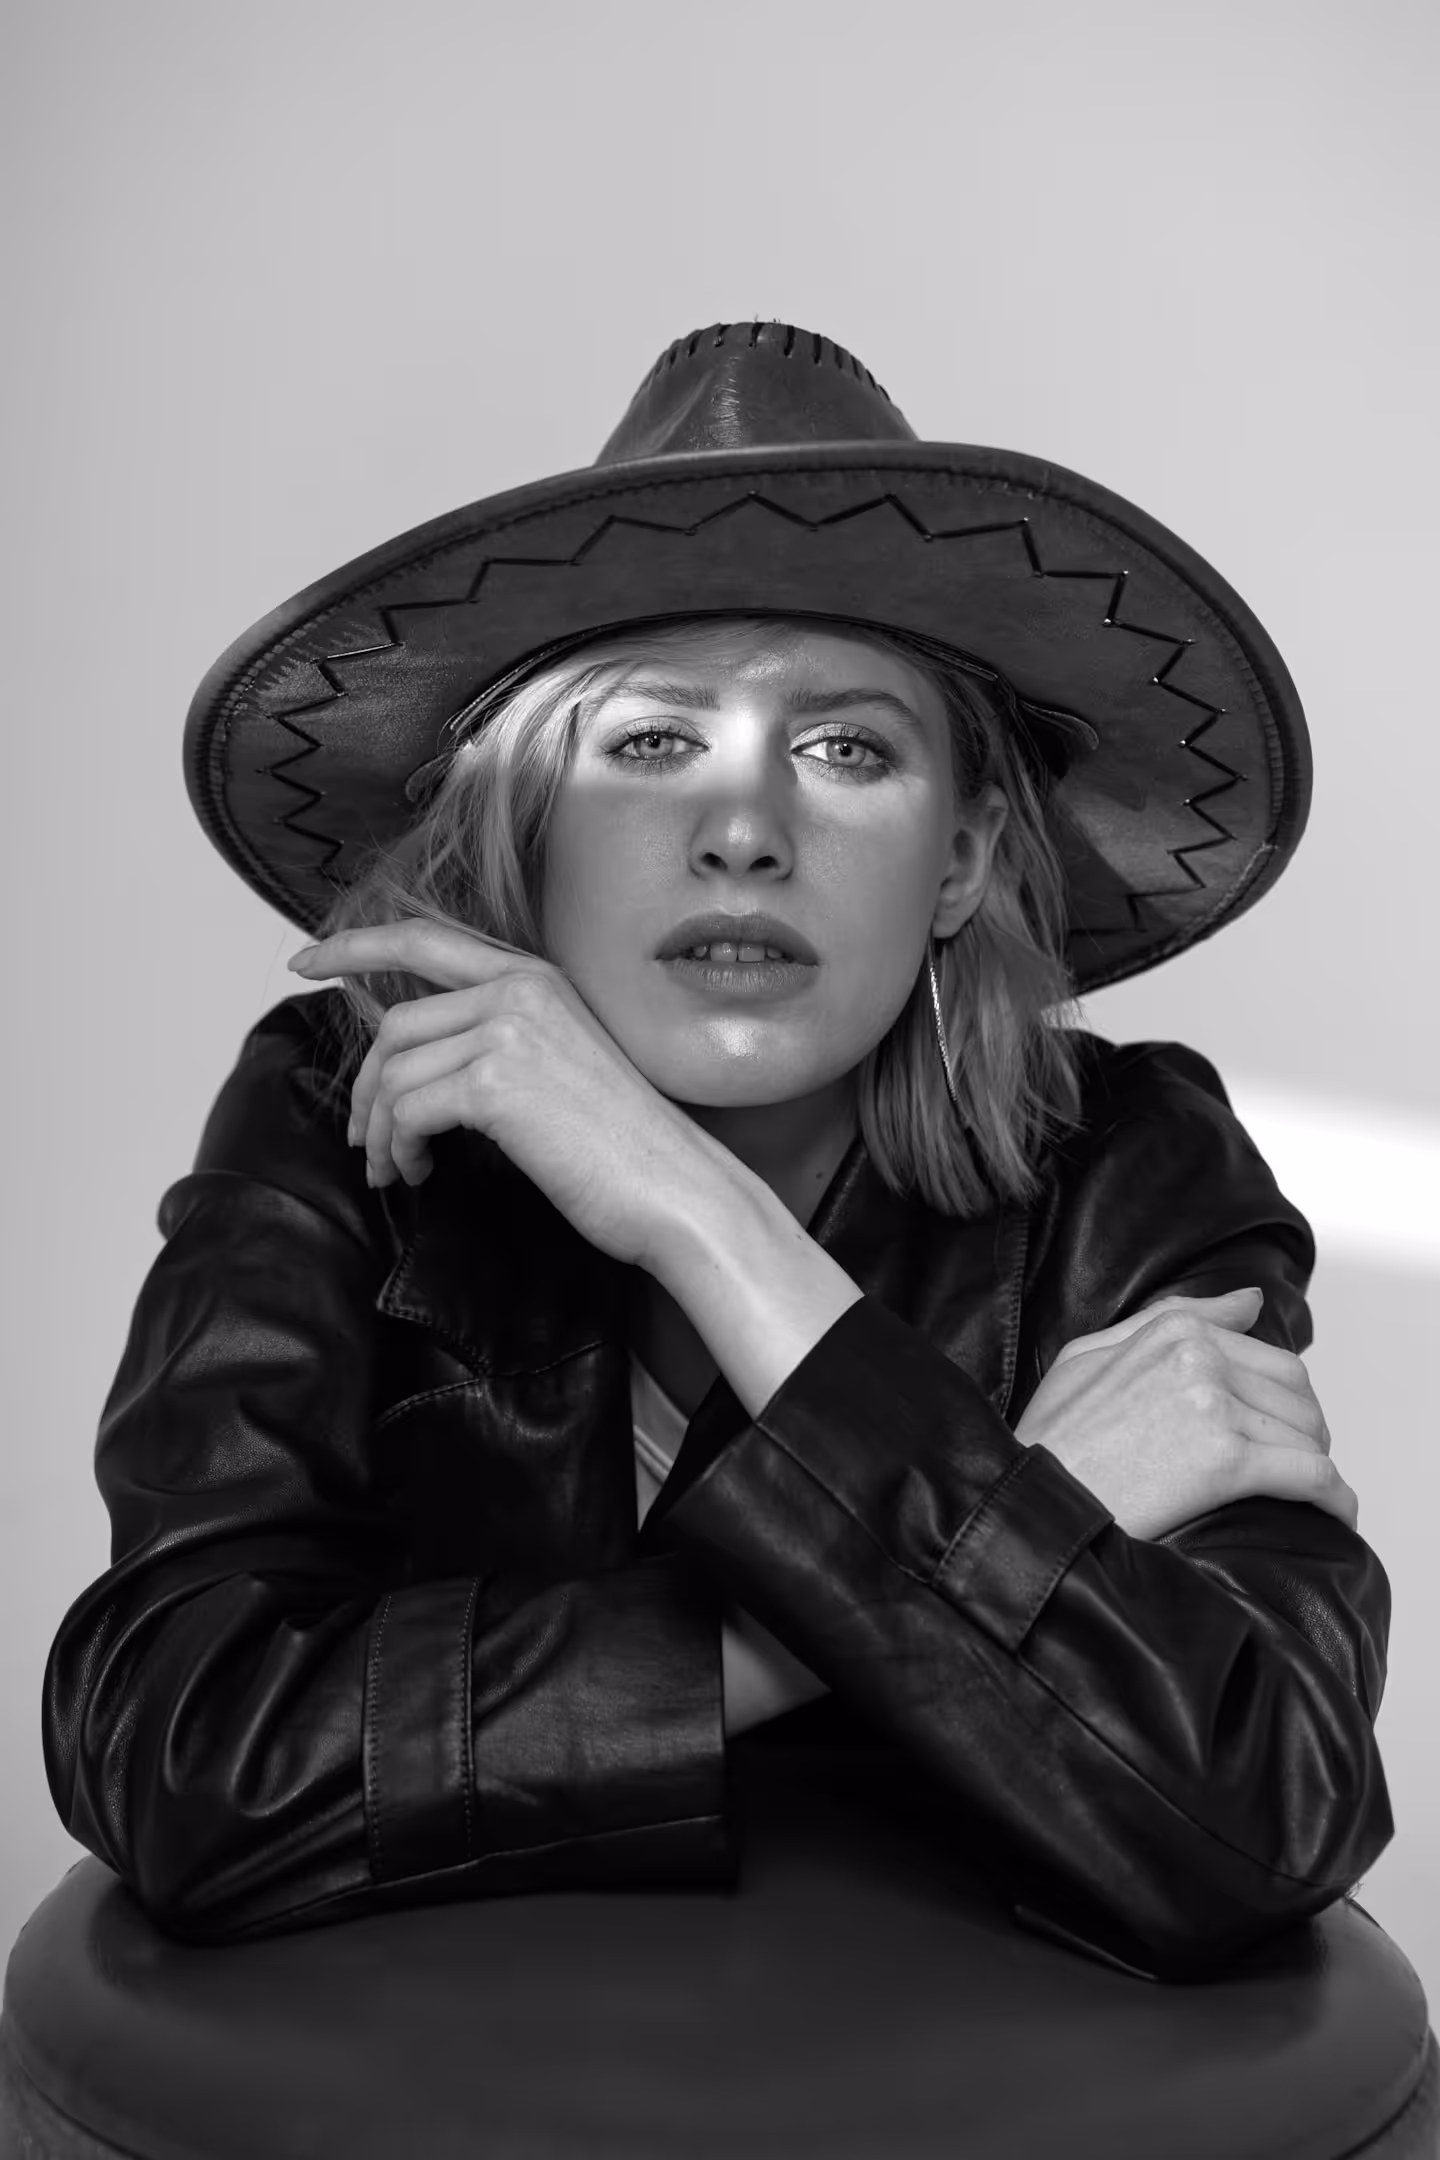
When the story is in expression and shape, black and white earns its keep. A clean black point, midtones nudged for skin, and a touch more contrast can make a simple frame feel considered rather than plain.
How we shoot it: Convert from RAW, set a firm black point, lift skin midtones, add gentle contrast, and guard highlight detail.
Natural light photography

Natural light tends to do a lot of good work for you too, early and late in the day carrying direction and colour that feels kind to faces, open shade at midday keeping things even. A quick white balance check, or shooting RAW, helps the colour stay believable as the light drifts.
How we shoot it: Work early or late or in open shade, turn the face toward the light, add a reflector if needed, and lock white balance or shoot RAW.
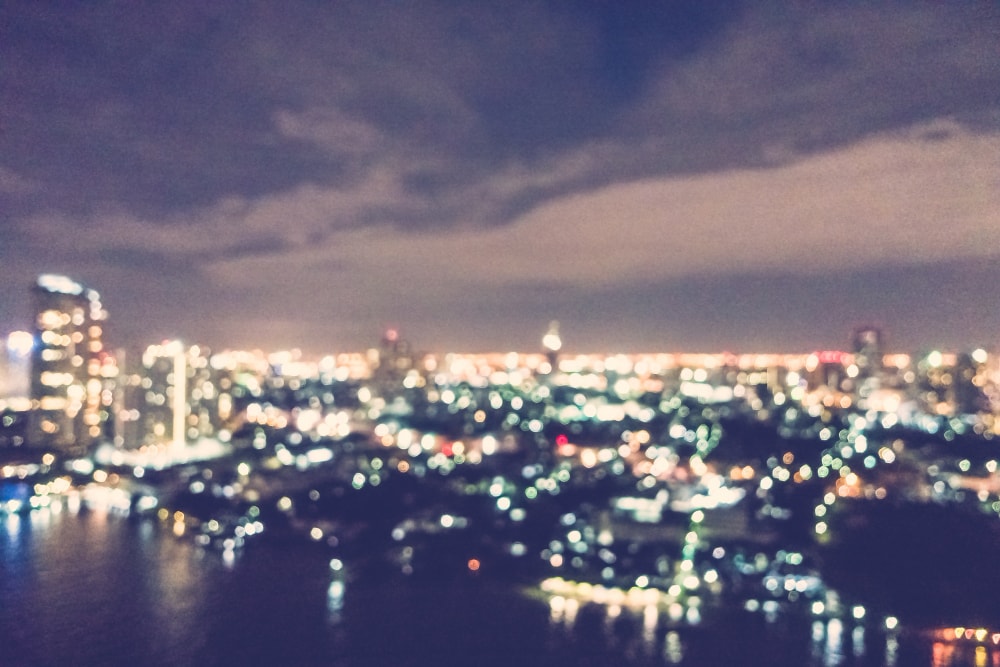
Night photography

Night pulls the palette somewhere else entirely. Neon, sodium, and shop windows paint in stripes and pockets, so a slightly faster shutter keeps the subject crisp while the city glows behind.
If a little blur belongs in the picture, the shutter can wander slower and the eyes can stay still, and the balance looks intentional rather than accidental.
How we shoot it: Start around 1/125 s for sharp faces, raise ISO or use a fast lens, add a small fill for clean skin tone, or slow the shutter deliberately for controlled blur.
Low-key portrait photography

Low key is less about making everything dark and more about letting shadow do some of the storytelling. A darker ground, spill kept in its lane, and a face lit with a little restraint often feels richer than a blanket of brightness.
How we shoot it: Keep the background dark, flag spill, use a tighter key or grid, and aim roughly for a 4:1 or higher face ratio.
High-contrast portrait photography

High contrast can be built the same way, with light and shadow doing most of the work before colour is asked to help. Pairing a cooler background with warmer skin remains a reliable way to give shape without shouting.
How we shoot it: Use a harder key with minimal fill, place lights to carve form, then add complementary colour only if it helps, watching highlights for clipping.
Infrared portrait photography

On days when you want a stranger flavour, infrared turns foliage to glow and skin to porcelain. That usually calls for a converted camera or an IR filter, a custom white balance, and a steadier hand because shutter speeds tend to run longer. The first frame explains whether that direction belongs to the set or just to the test.
How we shoot it: Use a converted IR body or a 720 nm filter, set a custom white balance, test focus for IR shift, and expect longer exposures or a tripod.
3. Finding new locations

Familiar backdrops are comforting, but they can make your pictures feel the same. A short wander changes everything, not just the scenery, but the way you see. Cities give you clean lines, glass, and reflections that frame a face without shouting.
Parks and beaches hand you bigger skies, easier backlight, and colours that breathe. The trick is not distance, it is noticing, how shade creeps across a wall, when a shop window turns into a softbox, which alley stays calm at 5 pm.
Before you travel miles, walk your regular routes at a different hour. Step two paces left to lose the lamppost, crouch to let the skyline carry the frame, turn your subject ten degrees and the whole mood softens. If permits or people are a worry, work light, be quick, keep doorways clear, and leave a place better than you found it.
Reflections are a gift on wet streets and shopfronts. Angle a touch to drop clutter and let the reflection hint at place without stealing the face.
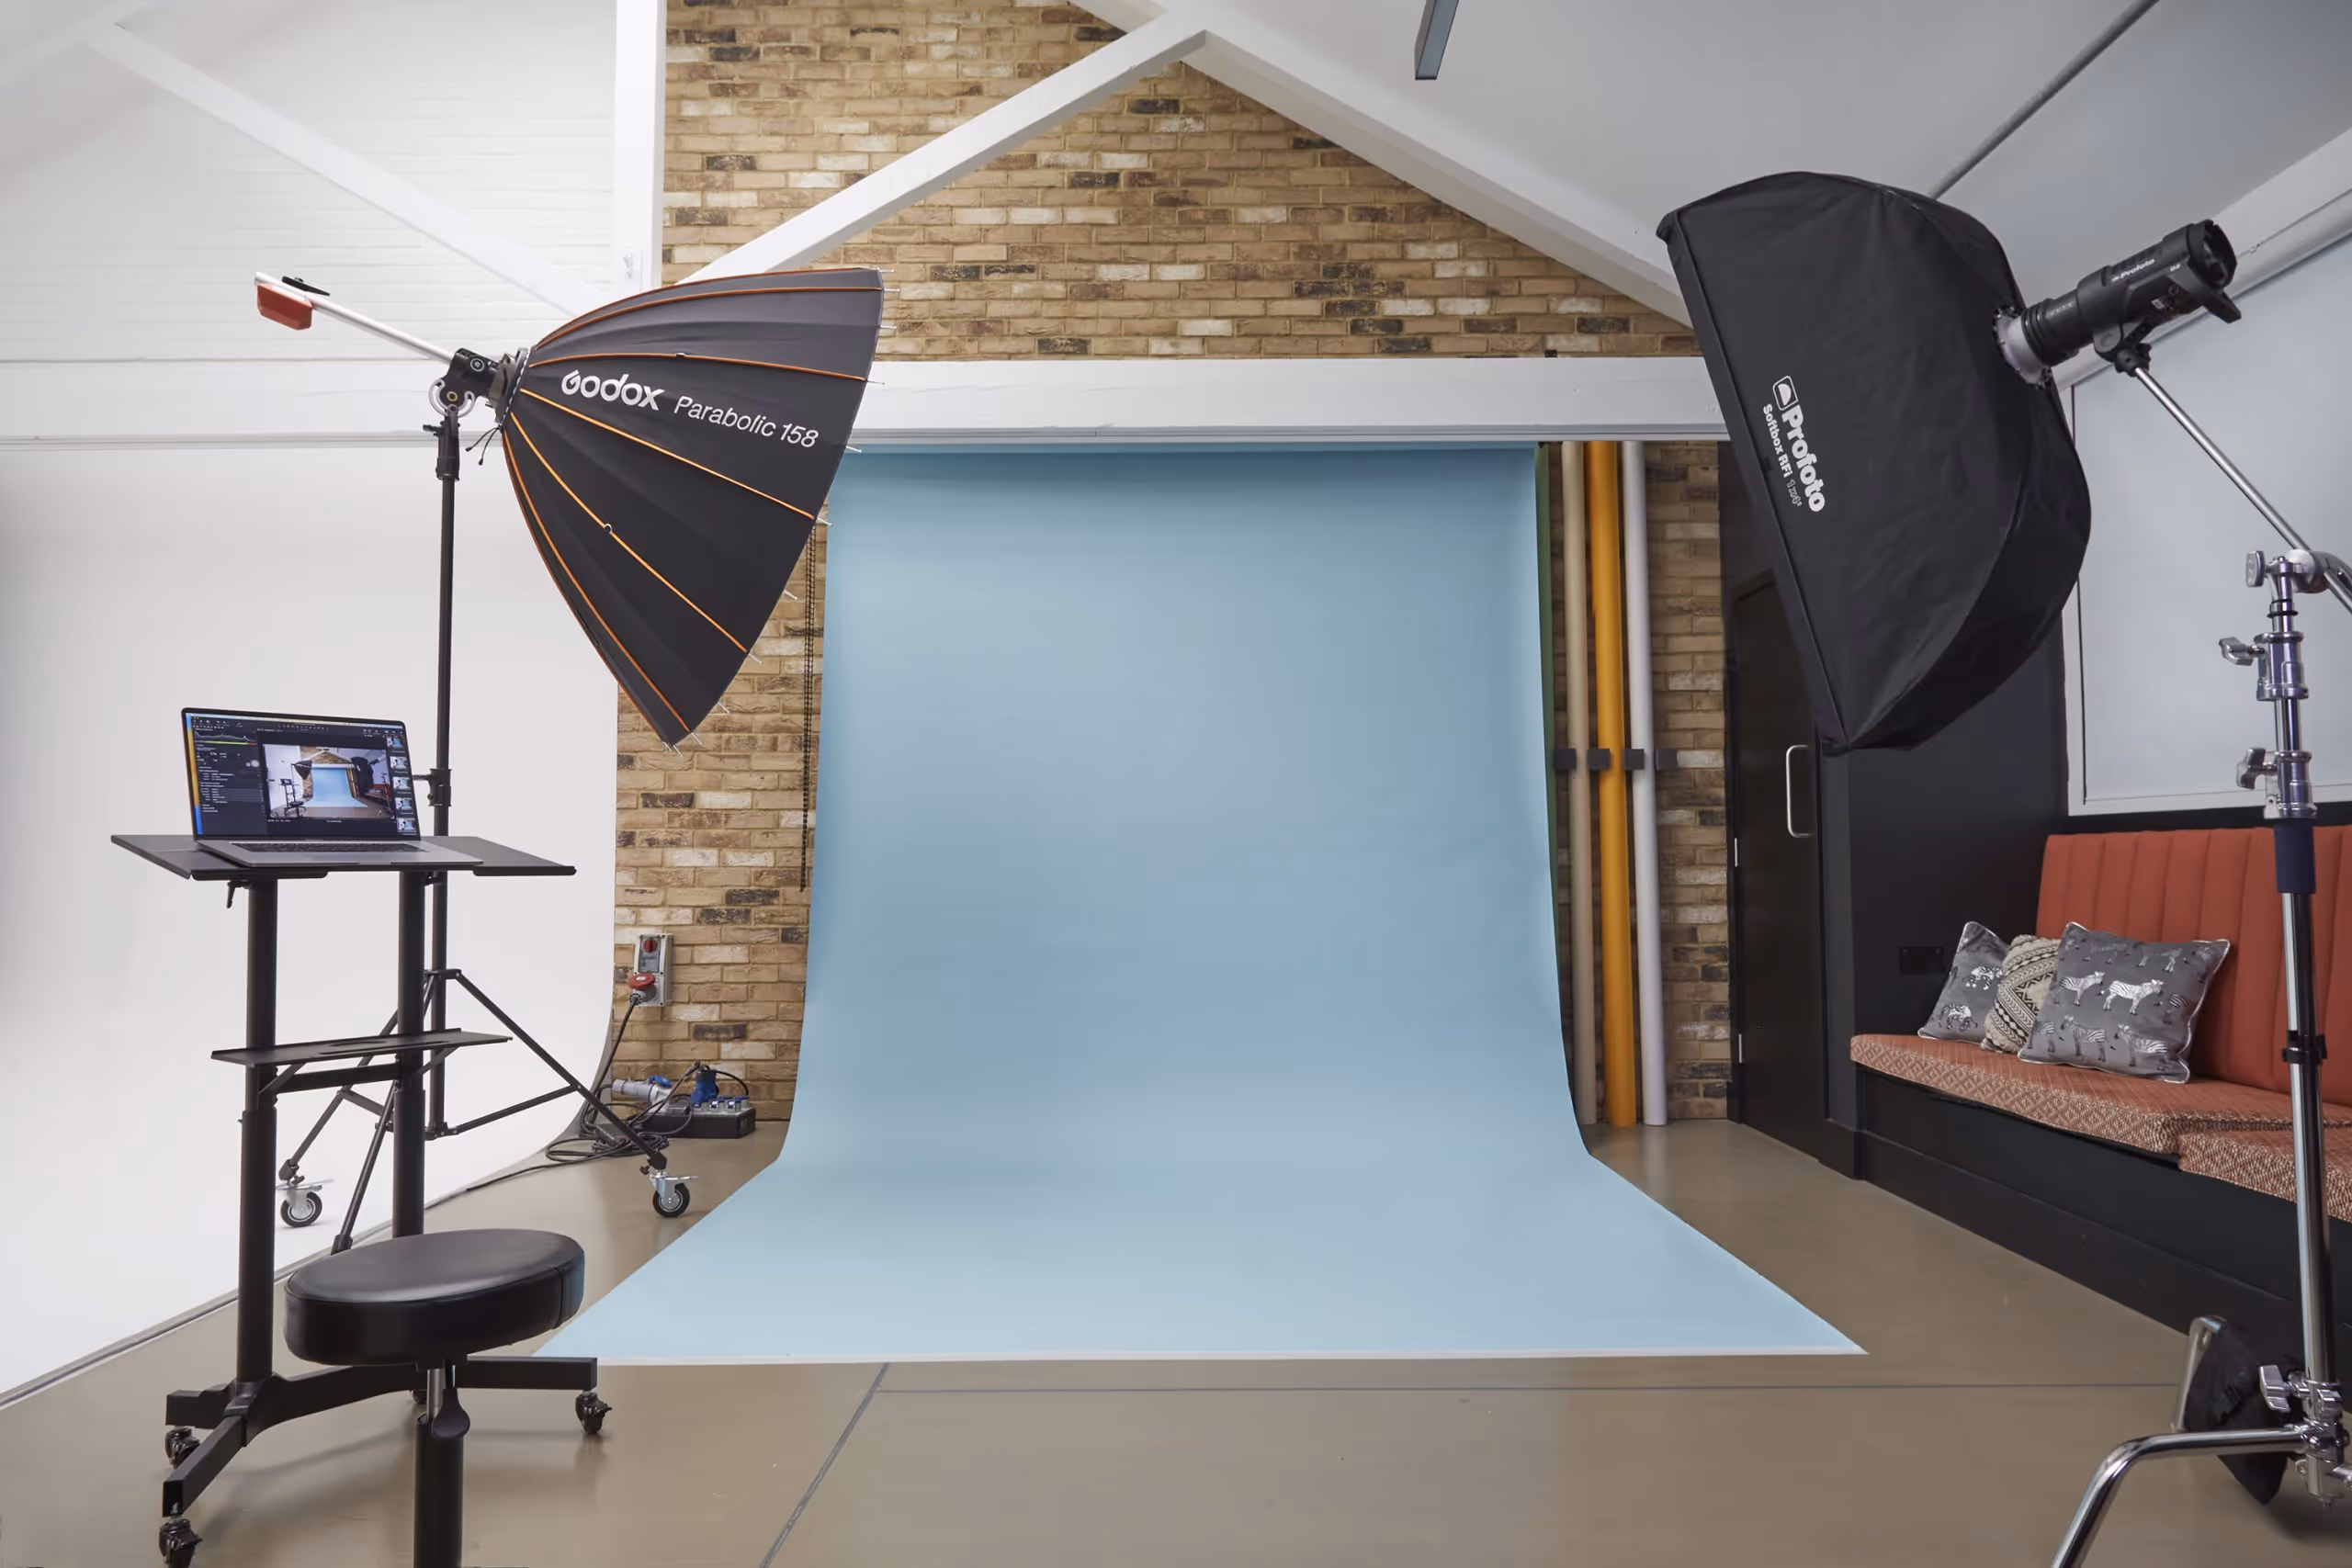
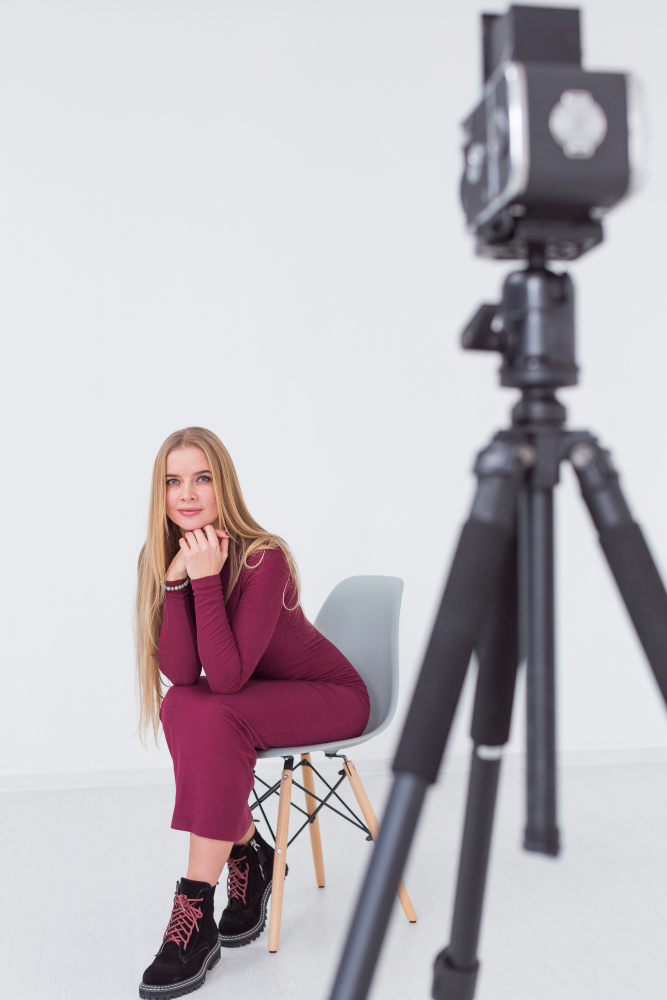
4. Studio portrait ideas
Studios are where you set the weather. Nothing drifts unless you want it to. Start with one light and a reflector, then build. A big softbox close in gives that soft wrap where skin looks alive without looking lit.
Bring the light up and centre for butterfly, drop and angle it for Rembrandt, add a gentle fill when you want the jawline to relax. If you are chasing high key, lift the background just a touch brighter than the face so it reads clean white without bleeding. For low key, keep the ground dark, flag the spill, and let the shadows carry some of the story.
Once the base sings, colour is the seasoning. A warm gel in the background can nudge the frame from corporate to cosy. A cooler rim can carve shape without turning the subject cold. Tether if you can, it keeps everyone honest about what is actually in the frame, and the micro tweaks land faster.
5. Practise different kinds of shots
Variety is not fifty poses, it is a handful of deliberate changes. Step closer and the picture becomes about eyes and breath. Step back and you give the subject room to live in the frame. Swap 85 mm for 35 mm and watch how the lines start talking.
A small drop in camera height adds quiet, a small lift adds poise. Ask for one still frame, then a tiny movement, a turn of the shoulder, a hand through hair, a breath out. The best frames often arrive one beat after the prompt.
Keep the tech steady so the play feels easy. For sharp portraits, work around 1/125 second or faster and focus on the lead eye. When motion belongs, slow the shutter on purpose and anchor one element so the blur reads as intention, not accident.
Review together every few minutes. Keep what sings, let the misses suggest the next move.
Traditional portrait photography
Traditional does not mean dull, it means clear intent. The aim is a true likeness with clean light and an uncluttered background. You will see these in studios and on location, front facing, three quarter, or a gentle turn, whatever flatters the subject and fits the brief.
Clarity and expression lead, not tricks.
Close-up portrait photography

Close ups draw the eye to skin detail and micro expression. If they feel unflattering it is usually because you are too close with a wide lens, not the idea itself.
Step back, use a longer focal length, keep the camera near eye height, and soften the light so features read gracefully.
Candid portrait photography
Candid in portraits means unposed moments, not pictures taken without consent. During a session this is the laugh between cues, the breath before a pose lands, the glance that feels real.
Work with permission, keep direction light, and be ready for the small gestures that tell the truth.
Low-angle and different perspectives

Angle changes the story. A low angle adds presence and energy, a slight higher angle calms and tidies lines. Slide a step left or right to lose clutter, crouch to give the background room, or climb a little to simplify shapes.
Try three viewpoints before you move on.
Eye portrait photography

Isolating the eye is a simple way to show detail and mood. A longer focal length or a macro setup keeps the frame clean, soft angled light gives a crisp catchlight, and precise focus on the iris does the rest. Ask the subject to hold steady for a beat and the frame will stay sharp.
6. Lifestyle portraits

Lifestyle sits close to portraiture but leans harder into story. You are not staging a perfect moment, you are shaping space and light so real moments can breathe.
Families and friends relax once there is something to do, a small prompt helps, make tea, read together, walk to the corner shop, fix a bike. Keep the setup light, keep an eye on hands and backgrounds, and let the laughter between prompts lead the frame.
The goal is honest pictures that feel like the day you shared, not a pose you forced.
7. Self portrait photography
Self portraits are a brilliant workshop because you control the brief and the patience. A selfie is quick proof of place. A self portrait is craft, light you set on purpose, a background you chose, focus you nailed.
Work out of a small zone you can return to repeatedly, mark where you stand, and use a remote or interval timer so you are not sprinting between frames.
Pre-focus on a stand-in at eye height, switch to manual focus so it does not drift, and refine the light by checking catchlights and shadow edges on your test frames.
8. Use silhouettes

Silhouettes work because shape does the talking once you let detail fall away. Put the brighter source behind your subject, sunset sky, a bright window, a lit corridor, then expose for the background and keep spill off the front of the subject. Profiles, hats, hands, and distinctive props read best.
A small step sideways often separates head from shoulder or arm from body, and that separation is everything in a silhouette.
9. Experiment with motion blur

Motion blur is an in camera look first, not a filter.
Pan with a moving subject so the person stays crisp while the background flows, or keep the camera still and let fabric, hair, or traffic blur around a steady face. In post you can finesse the effect, but the most convincing motion blur starts with shutter speed and timing.
10. Double exposure portraits
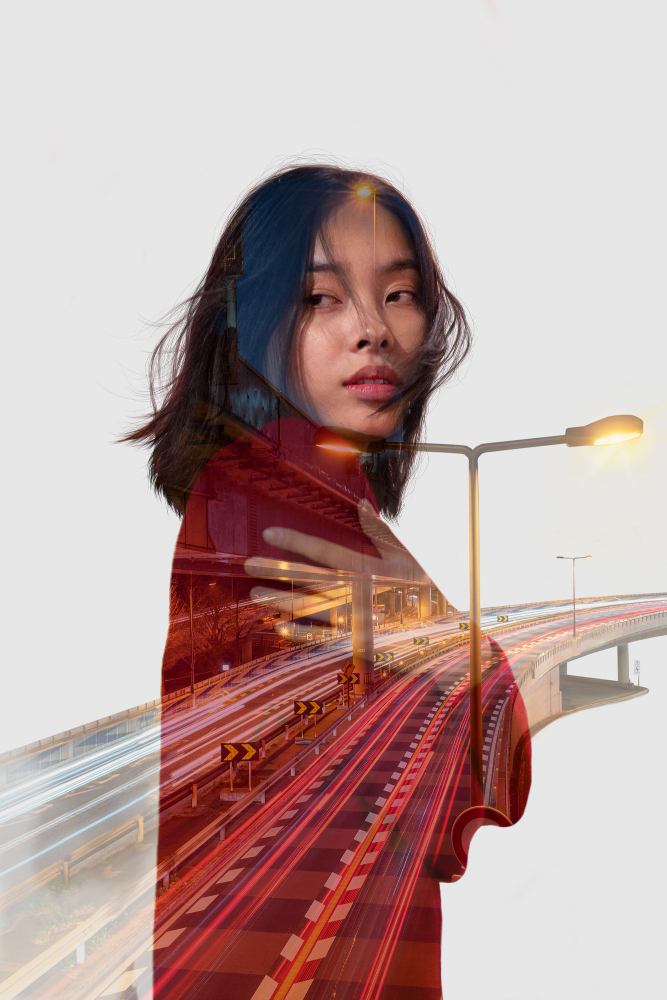
Double exposure blends two moments into one, a face with a texture, a profile with a skyline, a silhouette with a tree canopy. Do it in camera if your body supports multiple exposure, or in post by stacking two frames and letting the light areas of one breathe through the dark of the other.
The cleanest results start with a simple base, a profile or three quarter against a clear tone, plus a second frame with strong shapes, branches, architecture, ripples, anything that reads as pattern not clutter.
Exposure is the quiet craft. In camera, many systems use additive or lighten blends. A slightly darker base lets the second image sit inside without blowing highlights, and a bright, well separated texture keeps edges readable. In post, Screen or Lighten blends do similar work.
A gentle mask around eyes and lips keeps the expression intact while the pattern carries the rest.
11. Props and styling
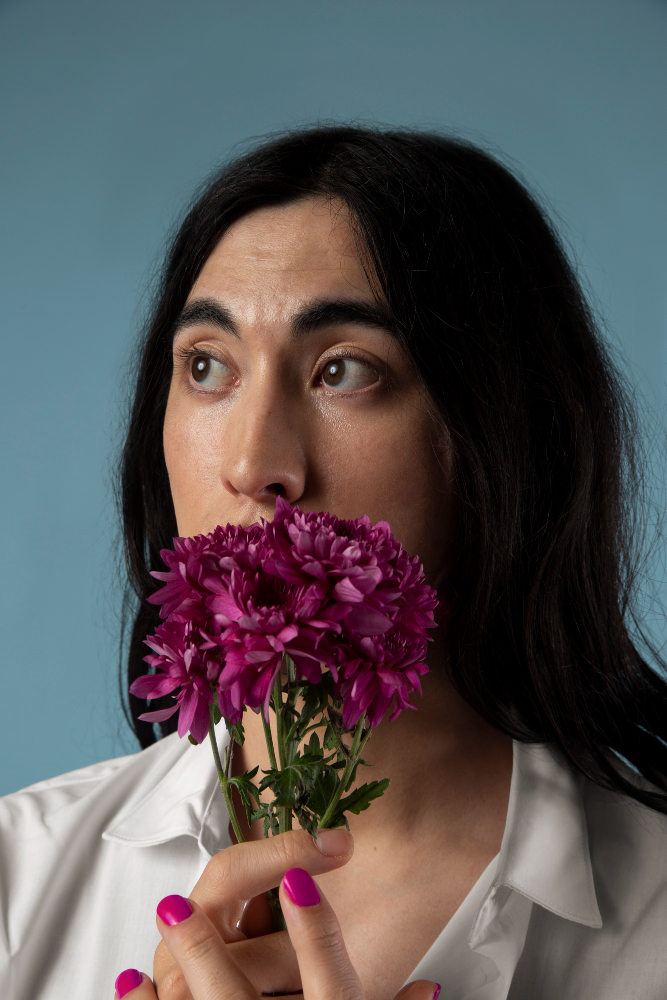
Props give hands something to do and a picture something to say. The best ones feel lived in, a worn jacket, a favourite book, a mug with a chip, a guitar that actually gets played. Pick pieces that match the palette you are already steering, neutral tones for calm, a single strong colour for lift, and avoid loud logos that date the frame.
Scale matters. Small objects belong close and high in the composition, larger pieces, stools, chairs, flowers, sit lower and carry shape without stealing the face. Texture is your friend too, knit, linen, leather, paper, all photograph beautifully under soft light.
If you're in a studio, keep the set clean and change one thing at a time so intention stays visible. On location, props tend to be found rather than packed, a market bag, a newspaper, a scarf caught by the wind.
Give the subject a simple prompt that fits the prop, turn the page, tune a string, pour the tea, then back off and let the movement find its own rhythm.
12. Reflections
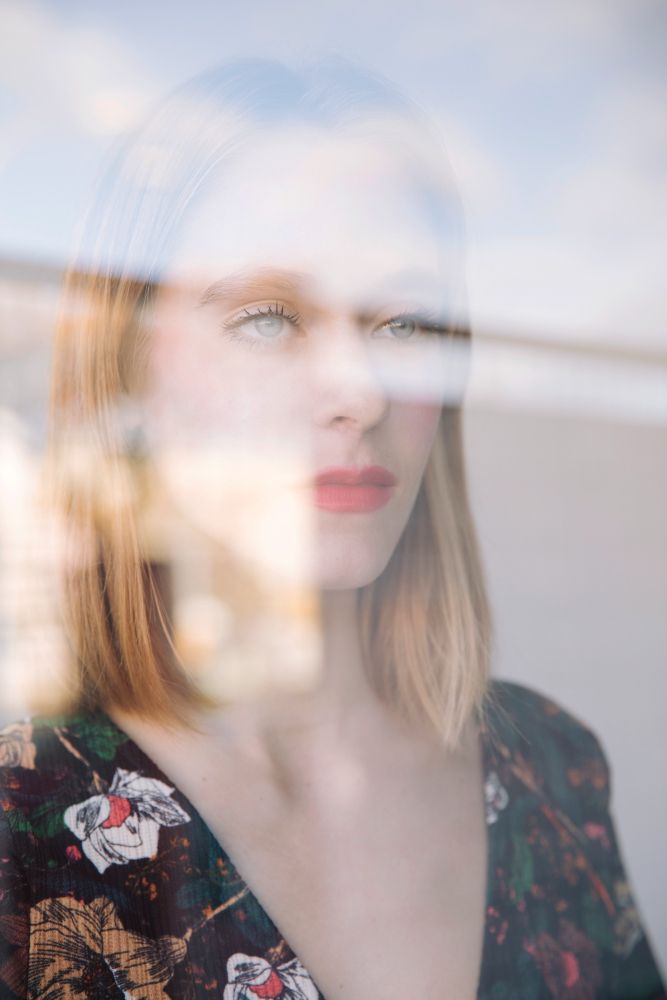
Reflections add a second layer without clutter, a face and its echo in glass, water, or metal. City windows, bus shelters, shopfronts, puddles after rain, even a phone screen held just out of frame, all turn into soft overlays that suggest place. Angle is the whole game, a tiny tilt loses street mess and lets the reflection sit where you want it.
Keep your subject a step back from the glass to avoid nose smudges and to stop the primary image from merging with the reflection. If colours fight, shift your position until the reflected light matches the scene, or set a custom white balance so skin stays believable.
Bonus tip: Post production techniques
Reviewed 8 November 2025

After the shoot, small edits can add the polish a portrait needs. Work non destructively, shoot RAW where possible, and start with global adjustments before you get selective. We edit in professional RAW processors for colour and tone, then a pixel editor for detailed retouching.
Some basic post production controls include:
- Exposure: Sets overall image brightness, recover highlights first, then lift shadows.
- Contrast: Adjusts tonal separation between darks and lights.
- Saturation: Raises or lowers overall colour intensity across the frame.
- Vibrance: Boosts weaker colours first and helps protect skin tones.
- White balance temperature: Warms or cools on the blue to yellow axis.
- Tint: Balances magenta to green, useful under mixed lighting.
- Sharpening: Increases edge acutance for crispness, will not fix blur or missed focus.
- Texture or clarity: Adds or reduces midtone detail, use lightly on skin.
- Noise reduction: Reduces luminance and colour noise, trading a little detail for smoothness.
- Creative blends: Double exposure, grain, or subtle split toning for mood, keep it intentional.
Tip: Make a virtual copy, apply the edit to the copy, and compare before and after at 100 percent view.
Stuck for ideas? Try different camera options
A simpler solution to feeling uninspired may just be a change in camera. Having a new camera can be exciting and make you want to get out there and start taking photos.
You could also try different shutter speeds or photo-taking options. You can try using a fast shutter speed and compare it to a slow shutter speed, or you could take photos in burst mode.
Exploring everything that your camera has to offer might make you realise you missed something that makes all the difference.
Explore and Experiment
Whether it's trying new shots or using different colours, you will never expand your skills if you don't explore new avenues of photography.
Don't be afraid of messing up and having to do a double take, and don't worry if you don't like the outcome either. The point of trying new things isn't always to succeed, but to widen your horizons.
Elevate your shoots at TYX Photography Studios

At TYX Photography Studios London, we support you with great spaces and reliable kit. Our studios are equipped with pro lighting and grip, clean backgrounds, and practical amenities so you can focus on the shot, not the setup. If you want help, we can be hands on, from a quick lighting check to full studio support.
Whatever you are planning, from a simple headshot to a full production, our team can make it sing. Hire by the hour or the day, add lighting and camera packages, book a technician, and make use of styling areas and client lounges.
We also offer photography services, from portraits and lookbooks to product and campaign work, delivered with clear direction and an efficient, cheerful crew.
Book your session today and experience world-class photography support.
Frequently Asked Questions
A dull portrait taken with a white background won't garner much interest. Playing with props, lighting and locations can all have a drastic effect on a portrait. If you want to make your portrait photos more interesting, then take them in a place with beautiful vistas and backgrounds. You can change the direction a subject is looking or their expression, and you can use props to convey a mood or to tell the viewer something about the subject.A portrait of a subject in their home, on a sunny evening, engaging in a hobby, will be much more interesting than a stand front-facing portrait of the same subject.
Lighting and angles can change how flattering the photos come out. Some lighting techniques, like butterfly lighting, emphasise the curves of the face by making the underpart of the nose, chin and cheeks appear shaded. This is great for showing the shape of the face with flattering curves.Short lighting is also a great lighting technique to try out. Short lighting leaves the part of the face closest to the camera in shadows. This results in the face appearing narrower.Angles are also a great way to make a portrait more flattering. It's no secret that some people have less flattering angles. Find the best angle for a subject's face and focus on that.
A creative portrait can ultimately come from anywhere! However, there are some things you can do to make a photo more interesting. Testing out different and unusual angles are one way to make a picture less dull and more creative. Try shooting from a tilt or a low angle to create different perspectives.Another thing you can do is change the location. Different locations spark different emotions, find one that gets those creative juices flowing.One of the more difficult ways to create a creative portrait is through the subject. What is the subject doing? What props are there? Play around with the subject and the props that are in the photo to see what different messages your photos can convey.
Adding filters, playing with angles and using different techniques can change an ordinary photo into something dazzling!If you feel that your portrait photography is uninspired, or that it's too dull, then using a variety of different camera and lighting techniques could make all the difference you need. A simple change in angle or composition can change an ordinary photo into something breathtaking.Be sure to use all the tools you have available, and don't be afraid to take multiple shots until you the best shot.
It is not a technical exposure rule. Popularised by photographer Paul Nicklen, it is a time and creativity split for a shoot, roughly 20 percent safe shots, 60 percent experimentation, 20 percent bold risks. Variants exist, but the spirit is balancing reliability with exploration.
The rule of exposure, often referred to as the exposure triangle, involves balancing shutter speed, aperture, and ISO to achieve the correct exposure. Properly adjusting these settings ensures your image has the right brightness, with details visible in both the highlights and shadows.
Our photo studios cater to a variety of photography needs, including fashion shoots, product photography, portrait photography, and more. Whatever photo shoot you have in mind, our facilities are equipped to support diverse creative projects.