Best Settings for Night Photography—Capture Stunning Shots after Dark
This guide explores the best settings for night photography, offering practical tips for capturing the night sky, city lights, and other low light scenes. You’ll discover how camera settings such as aperture, shutter speed, and ISO work together to produce great photos, along with useful advice on focusing techniques, post processing, and choosing the right night photography equipment. By the end, you’ll feel confident using manual mode or aperture priority mode for long exposures that reveal the true wonder of the dark.
Table of Contents
- The early history of night photography
- Understanding key camera settings
- Aperture and depth of field
- Shutter speed and capturing the scene
- ISO and noise management
- White balance and colour accuracy
- Focusing techniques
- Essential equipment
- Tips for city lights
- Light painting and creative effects
- Post-processing and final touches

Night photography offers a magical way to see the world after dark. Capturing the glow of city lights or the majesty of the Milky Way brings a fresh perspective to the familiar.Achieving the correct exposure in low light conditions requires knowledge of camera settings and a willingness to experiment.Choosing the best settings for night photography can feel daunting if you’re new to the craft. However, most modern cameras provide all the tools needed to shoot sharp, vibrant night photos.With the right combination of aperture, shutter speed, and ISO, you can gather enough light from the night sky or faint ambient light sources to produce images that will stand out.Modern cameras and lenses allow photographers to push night photography camera settings further than ever before. High ISO capabilities, fast lens design, and well-engineered sensors mean you can capture more light than what was possible only a few decades ago.We'll guide you through fundamental photography settings so you can capture stunning results in the dark.
The early history of night photography

Night photography has evolved significantly since the 19th century. Early photographers used glass plates coated with light-sensitive emulsions that had extremely long exposure times.Gathering as much light as possible was a challenge, and images were often grainy or blurry due to camera shake from slow shutter speed.By the early 20th century, new film technologies and mechanical advancements allowed for shorter minimum shutter speed options. Photographers like Alfred Stieglitz and Gjon Mili pioneered creative techniques to capture city lights, star trails, and light painting.These historical efforts helped shape modern approaches to shooting in low light conditions. The quest for more light drove photographic innovation for well over a century.Today, you can set the aperture as wide as f 2.8 or use a fast lens that performs admirably in very dim scenarios. The equipment is more accessible, and the principles discovered by early pioneers now inform the best settings for night photography in the digital age.
Understanding key camera settings
Night photography hinges on three primary settings: aperture, shutter speed, and ISO.Collectively, these determine how much light enters your camera, how motion is captured, and how much noise appears in the final image.Having full control over these photography settings can make the difference between a blurred mess and a razor-sharp photograph.Aperture – This refers to the lens opening and affects depth of field. A wide aperture like f 2.8 can gather more light but produces a shallow depth. A narrower aperture lets in less light but increases wide depth of focus.Shutter speed – This dictates how long the camera’s sensor is exposed to light. A long shutter speed is often used in night photography to collect more light. But it also risks introducing camera shake, so a sturdy tripod becomes essential.ISO – This affects how sensitive your sensor is to light. A higher ISO can capture enough light in dark conditions, though it also increases noise. Striking a balance between ISO low and a desire for detail is key.Manual mode is often the preferred approach for night photography because it grants freedom to adjust each of these settings independently.However, aperture priority mode can also be beneficial if you want to set aperture while letting the camera choose a suitable shutter speed, so long as you keep an eye on exposure times.
Aperture and depth of field

The aperture F value you pick is paramount in managing both brightness and depth of field. When taking pictures of a starry night sky, a wide aperture like f 2.8 can help you gather more light. This is crucial for capturing faint detail in the Milky Way or other celestial subjects.A shallow depth of field might blur foreground elements so consider focusing carefully if you want a balanced scene.For landscape photography in the dark, many photographers want both foreground and background in sharp focus.This could mean stopping down your aperture to something like f/4 or f/5.6. Although this narrower aperture reduces the amount of light hitting the sensor, it increases the zone of sharp focus.Experimentation will reveal the best approach for your scene. Some prefer f 2.8 to highlight the night sky with a dreamy bokeh on everything else.Others might opt for f/8 to capture city lights and architecture in wide depth clarity. In all cases, controlling aperture is key to ensuring you have enough light without sacrificing essential detail.
Shutter speed and capturing the scene

Shutter speed is a cornerstone of night photography settings because it dictates how long you expose your sensor to the dark environment. Using a slow shutter speed allows more light into the camera, essential for scenes that would otherwise be too dim.For star trails or light painting, you might use a very long shutter speed, anywhere from 15 seconds to several minutes.However, prolonged exposures demand a sturdy tripod to avoid camera shake. Even the slightest movement can ruin sharp focus, especially when you’re aiming for detail in the night sky photography or city lights.A cable release can further reduce the chance of vibration caused by pressing the shutter button.Set your shutter carefully to capture motion creatively. A 30-second exposure can turn moving car headlights into luminous streaks across your image. A minimum shutter speed of a few seconds can also transform waves or waterfalls into silky ribbons of light.Longer exposures unlock a realm of artistic possibilities, so don’t be afraid to push the envelope.
ISO and noise management

ISO determines how sensitive your sensor is to incoming light. Higher ISO settings help you capture dim scenes, but the trade-off is increased noise that can degrade image quality. Most cameras today offer a wide range of ISO values, and modern cameras in particular have improved high ISO performance.Striking the right balance is crucial. You want enough light to register detail in your image, yet you don't want an excessive amount of noise. Try to keep ISO low whenever possible, using a slow shutter speed or wide aperture to gain more light instead of cranking the ISO.If you’re photographing the night sky, an ISO of 1600 to 3200 might be a good starting point, although your current camera’s capabilities matter a great deal here.Some photographers opt for exposure stacking to manage noise during post processing. They shoot multiple long exposures at lower ISO and blend them, reducing the visible grain in the final scene. This technique requires more steps but can deliver extremely clean results.In all cases, controlling ISO is a key aspect of obtaining a good exposure in the dark.
White balance and colour accuracy

Adjusting your camera’s white balance is a subtle yet important aspect of capturing night scenes. City lights can cast an array of colour hues, and the night sky may appear cooler than expected on certain camera settings.Choosing a Kelvin value manually or relying on the camera’s white balance presets can drastically alter how your image looks.For crisp star photos, experiment with different temperature settings to see what yields natural, cool tones in the night sky. Street scenes might benefit from a slightly warmer or cooler white balance depending on your creative intent.Aperture priority or manual mode both allow you to lock the camera’s white balance so it doesn’t shift unpredictably between shots.

Post processing is another opportunity to refine colour balance, using software to precisely adjust the overall tone. By taking control of white balance from the outset, you’ll have more flexibility in shaping how your night photo conveys mood and atmosphere.
Focusing techniques

Achieving sharp focus can be one of the trickiest aspects of night photography. Autofocus might struggle in low light conditions, resulting in inaccurate focus or constant hunting. Switching to manual focus is often the solution, allowing you to pinpoint focus on distant stars or illuminated objects.A common trick is to use Live View (if your camera has it) and magnify the scene. You can then adjust the focus ring until the subject, be it the night sky or city lights, appears crisp.Another approach is to focus on a bright star, sign, or lamp in the distance, ensuring that infinity focus is set accurately.

Practice is essential for mastering this technique. If you’re capturing the Milky Way, learn the precise spot on your lens barrel that corresponds to infinity.Mark it down or memorise it for quick setup during future shoots. Focusing well is paramount for capturing stellar detail and ensuring your photos look professional.
Essential equipment

Night photography equipment can make or break your shoot, so invest in a few must-have items to boost your success rate.Sturdy tripod – The foundation for a stable platform that prevents camera shake with slow shutter speed or long exposures.Cable release – A handy tool to avoid physically pressing the shutter. This reduces the risk of shaking the camera during exposure.Fast lens – Preferably something with a wide aperture like f 2.8 or faster for capturing more light.Extra batteries – Long exposures can drain battery life quicker, so it’s wise to keep spares on hand.Most cameras these days are well-suited for night photography. You just have to be mindful of how you set aperture, shutter speed, and ISO. A wide angle lens is also worth considering, especially if you enjoy photographing the night sky with sweeping star fields.Above all, be patient and be prepared for some trial and error.
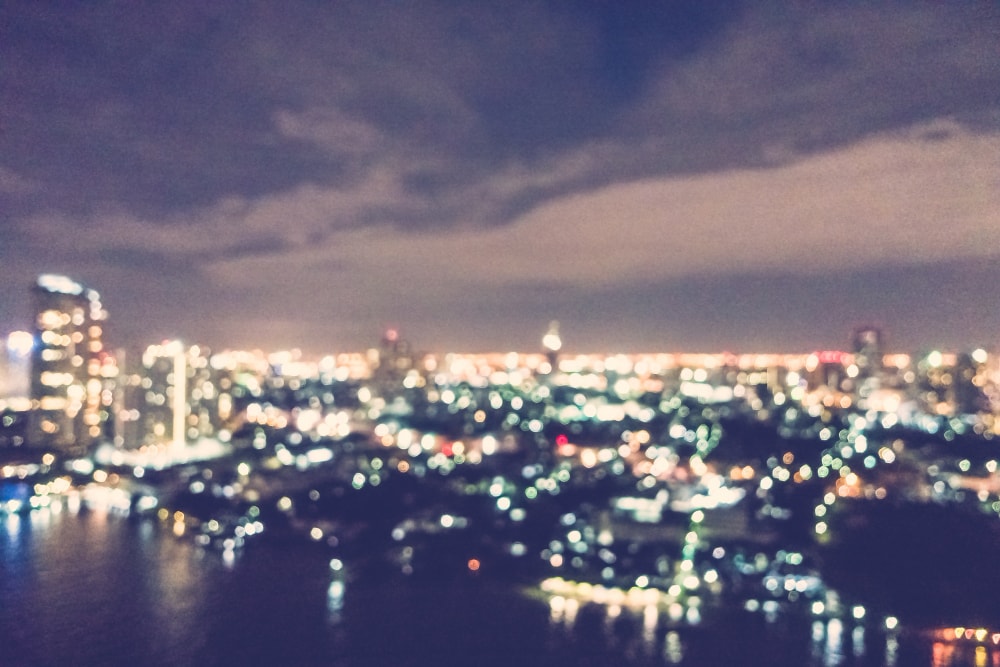
Tips for city lights

City lights create a dynamic canvas of bright lights, neon signs, and ambient light from streetlamps. Capturing these vibrant scenes involves balancing exposure, focus, and composition to highlight the unique energy of urban environments.A slow shutter speed can blur passing traffic into interesting light trails, while a fast lens might help you freeze action in more active nightlife settings.Consider using aperture priority if you want to control your depth of field while letting your camera compute the shutter. Be cautious, though, that the camera doesn’t choose an excessively long exposure time without your notice. When dealing with city lights, watch out for overexposure in bright neon signs.You might need to dial in some negative exposure compensation or use manual mode to preserve detail in the highlights.Experiment with framing and reflections. Many city skylines look stunning when reflected in water, creating double the sparkle. Seek out vantage points from high buildings or vantage platforms to capture sweeping cityscapes.With the right photography settings, you can create images that capture the essence of metropolitan nights.
Light painting and creative effects

Light painting is a popular form of night photography that involves using a handheld light source to “paint” parts of the scene during a long exposure. You might use a torch, sparkler, or even your phone’s flashlight to add creative streaks of light to your photos.This technique can transform otherwise dark landscapes into vibrant, otherworldly scenes.To get started, set aperture to a medium or wide aperture, depending on how much detail you want in the background. Next, use a long shutter speed—anywhere from 10 seconds to several minutes—so you have ample time to move through the frame with your light source.It’s often helpful to have an assistant or friend handle the lighting while you control the camera.Planning is key as you’ll need to anticipate where the light will go. Experiment with different shapes and patterns to see what suits the scene.Light painting allows you to infuse more creativity into night photography, as you transform your scene into a canvas.
Post-processing and final touches

Once your images are captured, post processing helps polish the final result. Editing software lets you tweak brightness, contrast, and colour temperature to align with your artistic vision. This is particularly valuable for minimising noise and enhancing details that might appear faint in the raw image.Noise reduction – Most editing programs offer powerful tools to reduce the graininess that can appear in high ISO night shots.Colour adjustments – Fine-tune your white balance to emphasise the mood. Enhance or dial back saturation in city lights or the night sky as desired.Exposure balancing – Carefully adjust highlights and shadows to ensure that bright lights are not blown out and the dark areas remain detailed.Be sure to keep your edits subtle so the images still look natural. If you plan to post your work on social media, you might find that larger images need to be downsized, sometimes triggering an “awaiting moderation” message on certain platforms.
Wrapping up
Night photography is as thrilling as it is challenging. By mastering settings such as shutter speed, aperture, and ISO, and by understanding how to manage camera shake and noise, you can capture great photos of the night sky, city lights, and more.Remember that practice is essential to discovering your favourite night photography settings. Experiment with manual mode, try aperture priority mode for convenience, and don’t hesitate to explore creative techniques like light painting or star trails.With patience, a keen eye, and the right equipment, you’ll find that dark hours hold endless opportunities for stunning, evocative images.
TYX Photography Studio

At TYX Photography Studio in London, we know that capturing the perfect shot is just as important as having the right concept. That’s why we provide professional-grade services to ensure your photos make a lasting impression, whether for personal projects, professional portfolios, or commercial campaigns.From shooting for a fashion editorial and brand content to capturing cherished moments, our expert team is here to bring your vision to life.Find out more about our photography services, and get in touch today to book your session.