


How to Record Vocals Like a Pro
This guide explains how to record vocals with a repeatable process you can use in a home studio or professional studio. From microphone selection and audio interface setup to polar pattern placement, pop filter use, and acoustic treatment, you will learn how to capture clear, natural vocals that sit easily in a mix.
Recording vocals is where songs become records. It is also where problems pile up if you guess your way through the chain.
In this guide, you will learn how to record vocals with a dependable process you can repeat in a home studio or a professional studio.
We will create a clean signal path from the microphone to the audio interface to the DAW software, control room reflections with smart acoustic treatment, and coach clear performances.
You will learn how to position a microphone stand, use a pop filter, and manage takes effectively.
By the end, you can record your vocals with confidence and deliver high-quality vocals that sit naturally in a mix.
Plan the session and set your goal
Great recording starts before you power up the audio interface. Decide what the song needs from the lead vocal. Is it intimate, bold, or breathy?
Define the role for any background vocals and how they interact with the backing track. Write a quick session plan with the sections you will capture and any ad-libs.
This helps you start recording with focus rather than drifting through takes.
Check logistics. The room must be quiet, the singer rested, water at hand, and the lyrics printed. Explain the transport controls and the record button so the singer understands your flow.
When people know how a session will run, they give a better vocal performance, and the recording moves faster. Good planning improves the recorded sound and reduces stress once the recording starts.
Build a reliable signal chain

A consistent chain keeps your recording stable and repeatable. Here is the core path.
- Microphone into an XLR cable.
- XLR cable into the audio interface preamp.
- Audio interface via USB or Thunderbolt into the computer.
- DAW armed to a clean track with meters in view.
This chain is simple, but each step matters.
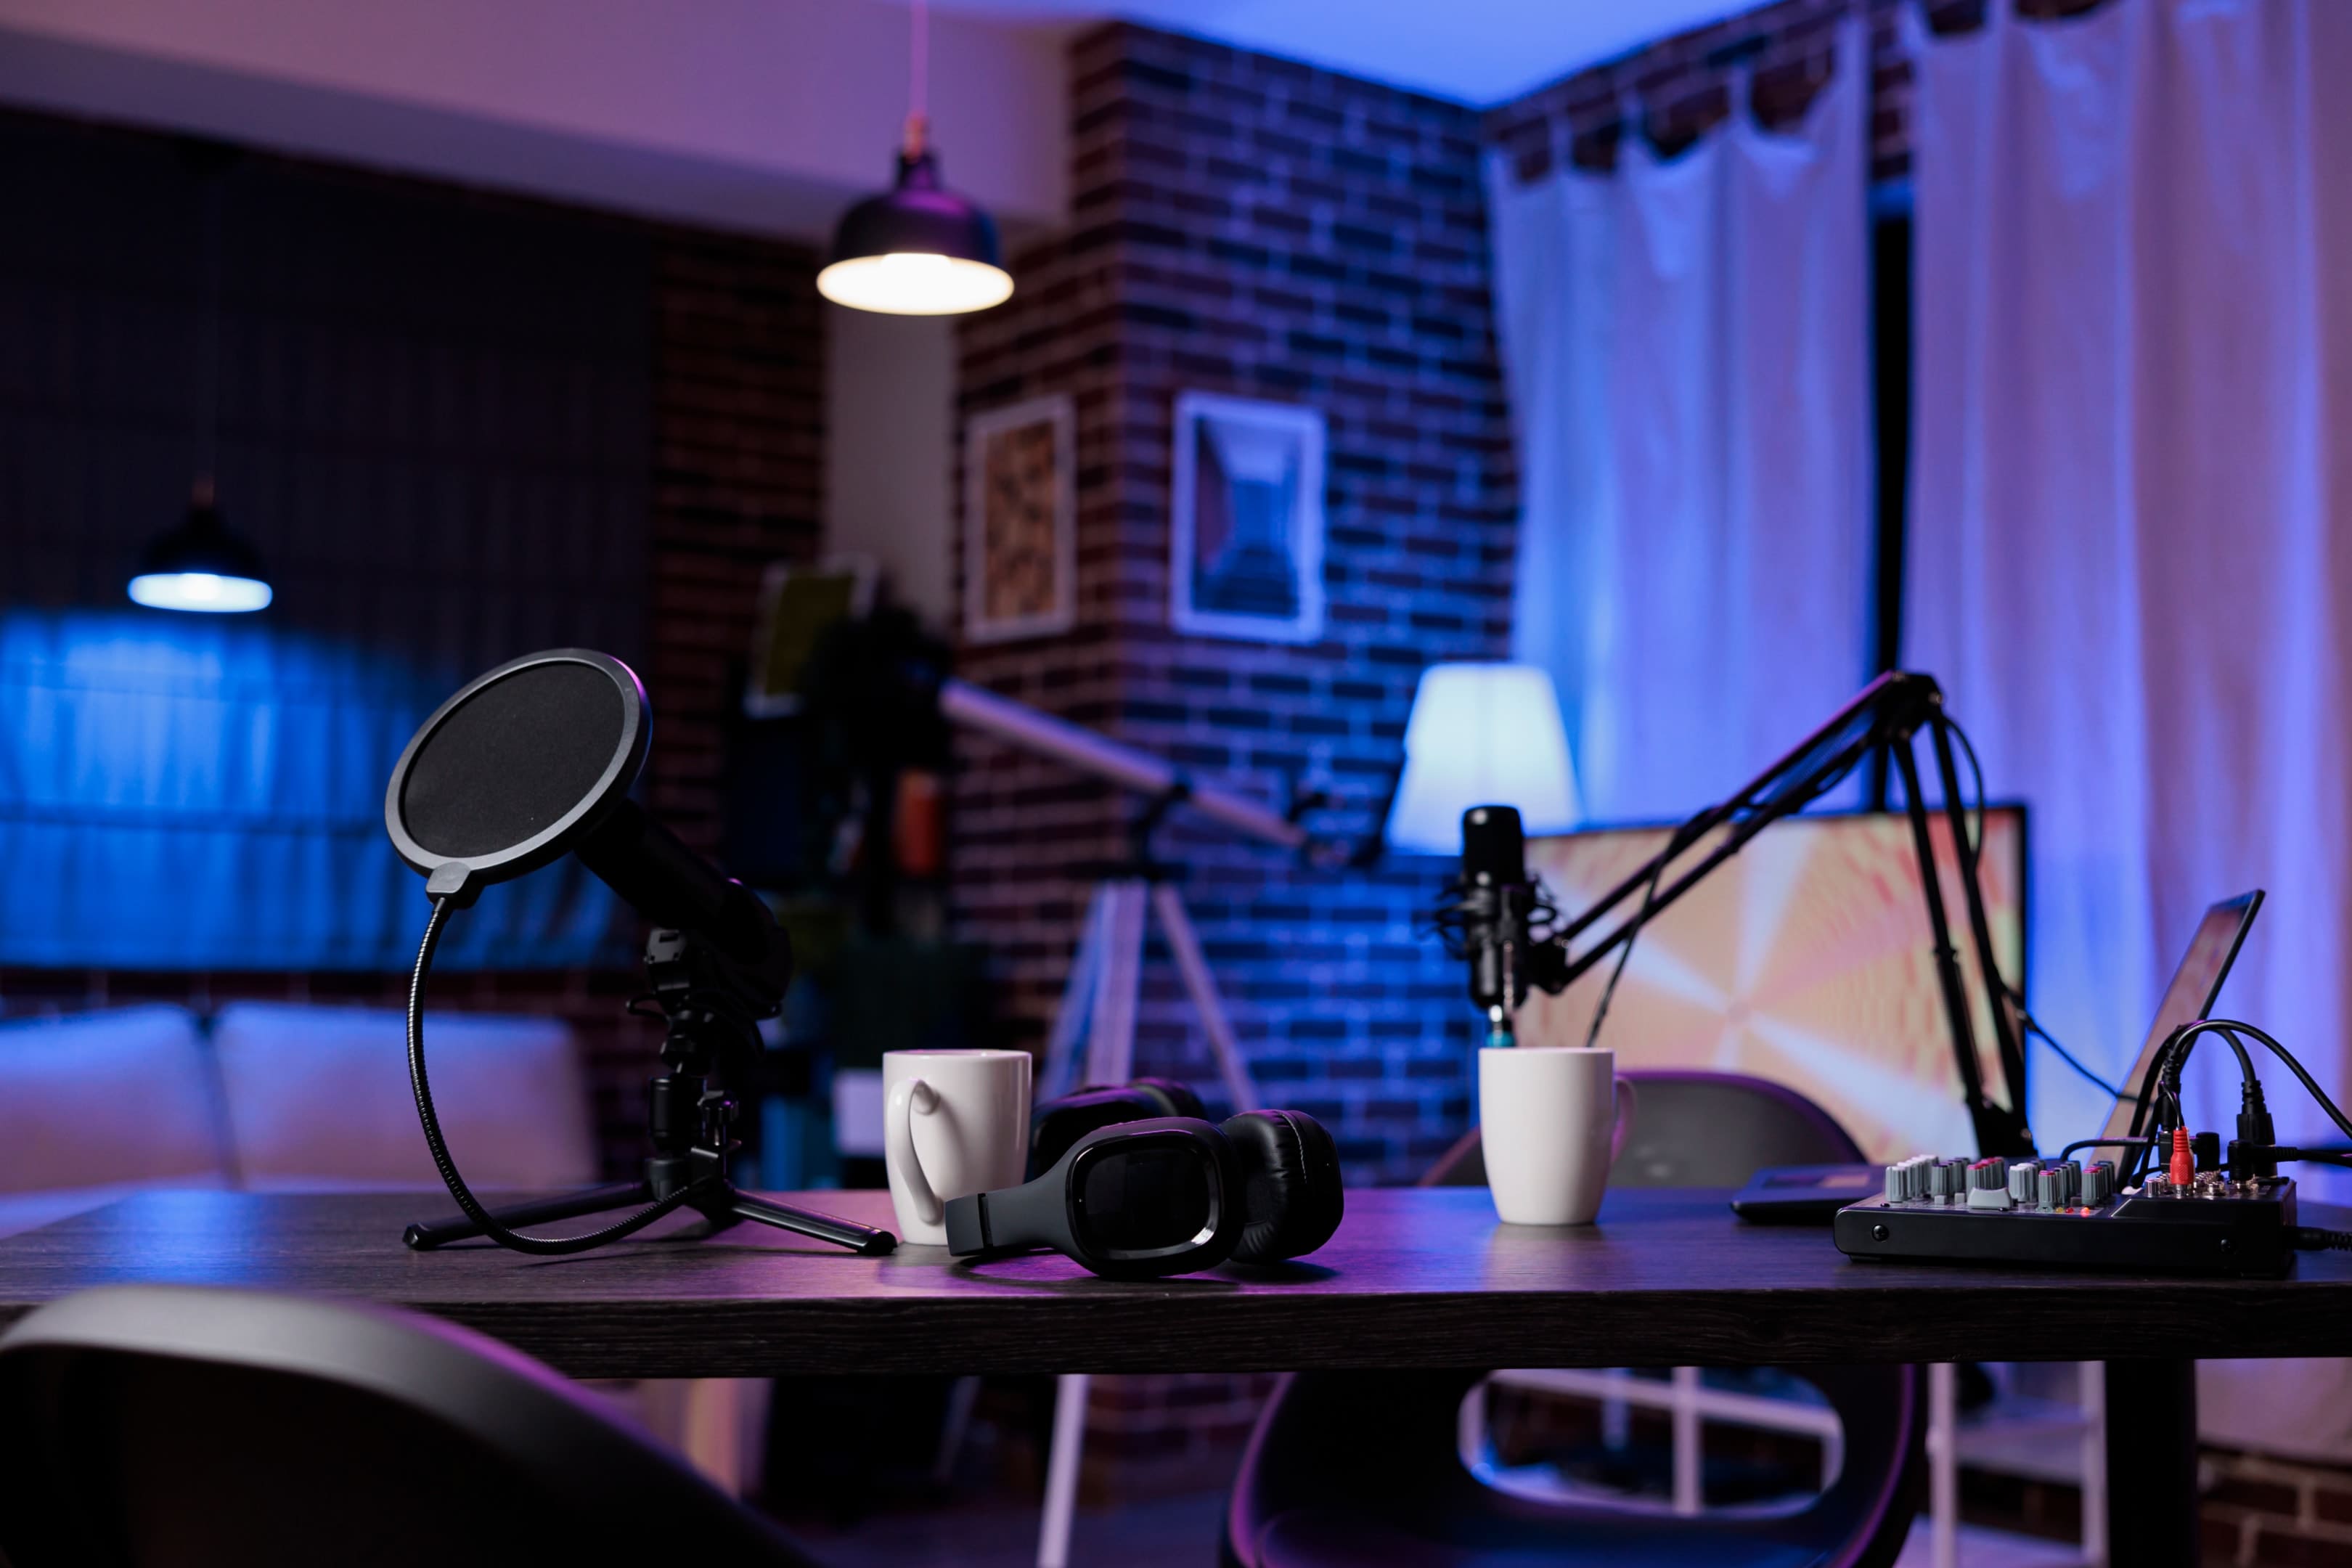
Choose a sturdy mic stand with a boom so placement stays locked. A shock mount cuts floor vibrations. Add a pop filter or a pop shield to tame bursts of air before they hit the capsule.
Turn on phantom power where required for condenser microphones. Do not send phantom power to vintage ribbons unless the manufacturer says it is safe, and avoid patching or normalising bays with power engaged.
Many modern units are protected, but caution is smart.
Set your audio interface to a sensible sample rate and buffer. Low buffer for tracking keeps latency small. A higher buffer for editing is fine.
Keep your gain structure conservative. Peaks around minus 10 dBFS leave headroom for sudden shouts while keeping the vocal signal above the noise floor.
If you hear computer fan noise, move the machine out of the room or angle the microphone away from it. Small choices here improve the sound you capture.
Choose the right microphone for the voice and room
Microphone choice affects tone more than most plug-ins. Start by matching the voice and the space.
Condenser microphones are sensitive and capture detailed sound with an extended top end. They are common for vocals in treated spaces. They require phantom power from your audio interface.
Dynamic microphones are robust and reject spill. They are useful when you must record in a noisy environment or a lively room.
Ribbon microphones have lower output and are often bidirectional. They benefit from high‑gain, low‑noise preamps and controlled rooms because they pick up front and back. They can flatter harsh sources without EQ if the recording is set up well.
If you are new, your first microphone might be a modest large diaphragm condenser. If the room is lively, try dynamic mics that are kinder to reflections. Some singers love classic models. For bright pop tones, people often reach for a Neumann U 87, which is a staple in many vocal rooms.
That does not mean it is the right microphone for every song. Make test passes and pick what supports the vocals you are cutting. Focus on the sound, not the badge.
Understand polar pattern and placement
Your microphone’s polar pattern shapes what the capsule hears. Cardioid microphones focus on the front and reduce pickup from the rear.
That is ideal when you want to reject reflections and reduce noise. Some condenser mics offer multiple options.
Try cardioid first, then test figure‑of‑eight if you want strong side rejection with more room tone front and back.
Aim the microphone at lip height. Place the pop filter 4–6 inches (10–15 cm) from the mic, and set the mouthpiece another 4–8 inches behind the screen. Angle the mic off-axis to soften sibilance without dulling the voice.
This small change can keep a good singer from spraying the diaphragm with plosives. Distance changes tone because of closeness effects.
Get closer for warmth and more low frequencies. Step back for clarity. Always listen and adjust rather than guessing. Accurate placement yields better sound and faster recording.
Treat the room to hear the voice
Room control is the cheapest upgrade you can make. In a home studio, put absorbers behind and to the sides of the singer. A duvet on a frame works in a pinch for mids and highs, but it is limited at low frequencies compared with broadband panels or bass traps. Bass traps in corners reduce boom.
Place a small absorber behind the singer rather than behind the microphone. That reduces early reflections that rush back into the capsule. Even simple treatment improves sound isolation and helps the microphone hear more voice and less room sound.
Switch off noisy appliances. Shut windows. Ask housemates for quiet. If you must record in a small flat, pick dynamic microphones that handle spill better than very open condenser microphones.
You can still get professional vocals if you manage the space with care.
Connect, test, and arm tracks
Plug the microphone into the audio interface with a healthy XLR cable. Secure slack so it does not tug the mic stand.
Engage phantom power if you are using condenser microphones or condensers that need it. Speak and check meters. If the interface clips, lower the preamp gain rather than pulling faders down later.
Open your DAW and label the audio tracks clearly. Arm a track named Lead. Arm a second track for doubles. Save a template so you can start recording faster next time.
Check that the transport controls respond and that the record button is mapped to a key you remember. Put a short marker before each chorus so you can drop in without scrolling.
These small steps speed up vocal recording and improve the sound you capture during recording.
Coach the singer and capture takes

Before you record your vocals, warm up gently. Hydrate. Do a short read-through of the lyrics out loud.
Ask the singer to start singing quietly while you position the vocal mic. Keep the headphone mix musical.
Too much reverb makes tuning harder. Too dry can feel exposed. Find the balance that encourages the best performance.
When recording vocals, roll early and let the singer run past the end. This keeps people relaxed. If the singer tenses, reset the scene.
Change lighting. Stretch. Celebrate small wins. The human side gives you more usable takes than gear ever will. Your aim is confident vocals that deliver the song, not just a tidy waveform.
Clear direction and simple feedback improve the sound of every take.
Place the mic and stabilise the rig
Position the microphone stand so the singer stands tall and can move a little. Lock the boom. Add a shock mount if you have one.
Fit the screen and step back to listen. Move the mic slightly up for a bit more chest weight. Lower it to brighten a dull tone.
Ask the singer to tilt or turn a few degrees to balance sibilance. This is quick and powerful. Do not let a wobbly mic stand ruin your session. Tighten clamps and check again between takes.
Gain staging, monitoring, and safety passes
Gain staging is essential to clean, professional mixes.
Set your audio interface preamp so peaks land safely below zero. Watch the meters while the singer belts. Leave margin. If you need more level in headphones, raise the monitor send rather than pushing the preamp.
A clean, quality recording beats a loud, clipped one every time.
Record a few safety passes of the lead vocal across the full song. Then move to sections. Capture stacks for background vocals.
Keep a checklist of lines that need another pass. If a phrase keeps missing, adjust the lyrics on the stand or change syllable stress. You are producing as much as recording.
Manage takes, comps, and quick edits

After each pass, drop a marker and make brief notes. Label takes like Verse 2, tight timing or Chorus 1, more energy. When you stop to comp, create two tracks for main and alt.
Swipe the best lines. Crossfade overlaps. Remove clicks and lip smacks that distract. Keep breaths that feel musical. This is how to record vocals with consistency. You are building a performance from strong moments rather than waiting for a perfect run.
If you notice low rumbles from foot taps or traffic, use a gentle high-pass filter around 80 to 100 Hz on the lead vocal. This trims mud without thinning the voice. Do not overdo the filter, or you will lose body.
Tools that make recording smoother
Some tools are small but mighty in a home studio.
- A high-quality pop filter that stays in place.
- A comfortable pair of closed headphones for spill control.
- A heavy microphone stand that does not droop.
- A quiet audio interface with clear metering.
- Spare XLR cable in case of crackles.
These basics help you record your vocals without fuss. They also scale when you book a professional studio since the workflow matches. Good tools raise the sound quality of every recording you make.
Matching microphones to styles
Different vocals ask for different tools. For airy pop leads, many engineers reach for condenser microphones with a smooth top end.
For rock or rap in a tight bedroom, dynamic microphones keep reflections under control.
For classical vocals or jazz, a refined condenser can capture the natural voice with grace. Ribbon microphones can soften bright sources and add weight to edgy voices.
Always check the frequency response chart and listen in context rather than solo.
The right mic is the one that serves the song in the room you have. Target the sound you want and judge by the recording you hear, not the price.
Interfaces, cables, and clean power

The audio interface is the bridge between the microphone and your computer. Choose a model with solid preamps, clear gain knobs, and reliable drivers.
Two inputs are enough for most vocal recordings. You can add an outboard later. Keep XLR runs short and tidy.
Use quality cables with good connectors. Phantom power should be stable and simple to toggle.
If your interface lets you save hardware settings, store a preset for vocals so you can start recording faster next time.
Handling noise before it ruins takes
Noise sneaks in from many places. Listen for background noise from fridges, traffic, or HVAC. Unplug what you can.
If the interface or the computer adds hiss, reduce noise by moving power supplies away from the microphone cable.
Computer fan noise is a classic culprit. Put the tower outside the room or behind a screen.
When a spill is unavoidable, pick dynamic mics and keep the polar pattern tight. You can clean small problems later, but clean capture is always better.
Better capture equals better sound and smoother vocal production downstream.
Performance psychology that lifts takes

Technical choices set the stage, but people make records. Keep the room positive. Compliment specificity, not just effort. Say that softened consonants made the chorus sit better.
Ask for one more pass with clarity rather than a command. The result is a better vocal performance. The singer hears belief. You capture the best performance faster and with less strain.
Layering and doubles for more depth
To add more depth, record tight doubles of the chorus.
- Pan a touch to widen. Record low harmonies for weight and a high line for lift.
- Keep background vocals on clean audio tracks so you can process them separately.
- Use a low shelf to tuck doubles behind the lead vocal.
- A little chorus or short delay differentiates layers without cluttering the sound.
Fix problems at the source
If sibilance bites, rotate the microphone a few degrees or change distance. If plosives persist, move the screen closer to the capsule and ask for softer P and B articulation.
If the take sounds muddy, step back to ease bass build‑up from closeness. If brightness feels harsh on condenser microphones, try dynamic mics or engage a ribbon for a pass. Solve it in the room. That is how to record vocals that mix easily later.
Quick guide to special cases
- Rappers and close mic tone: Work closely for urgency, but angle the capsule and place the screen carefully.
- Whispery singer: Use sensitive condenser microphones, then treat the room heavily to keep the recorded sound clean.
- Aggressive belter: Pick dynamic microphones to avoid brittle overload and keep spill under control.
- Spoken word: A steady vocal mic and a calm delivery win. Choose cardioid microphones to focus the sound.
USB and mobile options
If you need to record in seconds, a USB microphone is convenient. It combines a microphone and interface, so setup is simple.
You lose some flexibility for multi‑mic expansion and external routing, but it is a valid way to start vocal recording, sketches, or guide takes.
For releases, an audio interface with discrete microphones gives you more control and a path to professional vocals as your skills grow.
From tracking into tidy edits
When takes are down, consolidate and save. Strip silence where appropriate to reduce noise between lines.
Crossfade edits so breaths sound natural. Light compression can even the dynamics, but do not clamp it flat.
At this stage, you want clarity, not a final master. Name stems clearly. Now you can start mixing with intent rather than fixing faults that should have been addressed while recording.
When to book a larger room
Some songs need space. If your room is small or reflective, or if the singer needs a bigger environment to perform, consider a professional studio.
A professional studio gives you better acoustic treatment, silent air systems, and premium microphones. It also provides a predictable audio interface and headphone network.
You can bring your own session template and jump straight to recording studio vocals without relearning the workflow.
Troubleshooting fast answers
- Thin tone: Move closer, watch closeness effects, and choose a warmer microphone.
- Boomy lows: Step back, lift the mic, and use a gentle high pass filter.
- Plosives: Reposition the screen and angle the capsule.
- Clicks: Replace the XLR cable and re-seat connectors.
- Latency: Lower buffer on the audio interface and mute software monitoring if needed.
Example signal chains you can trust
Dynamic path for untreated flats. Dynamic microphones into a clean audio interface, screen, short XLR cable, cardioid pattern, close placement, and light EQ.
Clean condenser path for treated rooms. Large diaphragm condenser microphones with shock mount, pop shield, stable microphone stand, P48, and two tracks for safety.
Character ribbon pass. Ribbon microphones with a high-gain preamp, careful placement, strong room treatment, and restrained top‑end EQ later.
These paths cover most use cases. They let you record your vocals with repeatable results while leaving creative space for vocal production later. Better chains make better recording results and a more consistent sound.
Final thoughts
Recording vocals is not only about microphones, polar patterns, or phantom power. It is about setting up a clear process that works in a home studio or a professional studio.
With preparation, clear direction, and attention to detail, you can record your vocals with confidence and build performances that serve the song every time.
Book a studio to elevate your vocals
-p-2000.jpg)
At TYX Studios, we know that great vocal recording blends the right gear, the right space, and the right guidance.
Whether you are working with condenser microphones in a treated home studio or dynamic microphones in a tighter room, the fundamentals remain the same: clean signal path, smart acoustic treatment, and consistent takes.
Our recording studio facilities provide professionally designed rooms, silent monitoring systems, and premium microphones so you can focus on performance while we handle the technical side.
Book a session at TYX Studios and work with our engineers to capture professional vocals that bring your project to life.
Frequently Asked Questions
Start with the pop filter 4–6 inches from the mic and the mouth a further 4–8 inches behind it. Adjust by ear for tone and control.
Use phantom power for condenser microphones, skip it for most dynamic microphones and most ribbons unless the maker says otherwise. Avoid patching with phantom engaged.
Close windows, switch off fans, add acoustic treatment, angle the microphone, and reduce noise at the source before any plug‑ins.
Comp. Capture several takes, then assemble the best lines for a confident and consistent result.
You can with a USB microphone, but an audio interface with an XLR vocal mic gives you more control and better upgrade paths.
You are too close or the room is ringing. Step back, lift the capsule, or use a gentle high pass filter to trim rumble.
Aim for peaks around minus 10 dBFS so you keep headroom and avoid clipping during strong passages.
Match the voice and the room. Test dynamic mics in lively spaces and condenser microphones in treated rooms. Choose the right microphone that serves the song.
Aim at lip height, then adjust angle and distance. Use the polar pattern to control spill and reflections.
Yes. Record doubles on separate tracks so you can pan, EQ, and time‑align without affecting the main line.


How to Record Bass Guitar Like a Pro
Learn how to record bass guitar that locks with drums, translates on small speakers, and needs less fixing later. Use this checklist-driven guide and work faster. This bass recording guide preserves the original flow and adds precise updates where needed.
