Acoustic Treatment Guide by Experts, for Beginners
Drawn from daily work in TYX control rooms and vocal spaces, this guide shows how acoustic treatment makes small rooms clear, controlled and reliable.
Every reliable studio begins with the room, not the rack. At TYX Recording Studios, we have professionally treated rooms that are regularly measured for consistency. However, the core processes used also apply to home studio setups.
Ultimately, the biggest gains in the overall sound quality of a recording come from acoustic treatment inside the space. When surfaces stop arguing with your speakers, you hear direct sound, make faster decisions, and print mixes that travel.
This guide shows how to shape the space so monitoring is honest without killing feel. We explain what to do first, why early reflections mislead you, and how low-end control removes the worst colour from the room. You will also see where treatment ends and isolation begins, since soundproofing uses a physical barrier to block external noise while acoustic treatment refines what you hear inside.
Acoustic treatment vs soundproofing

Start by separating room acoustics from isolation. Acoustic treatment manages reflections and frequency balance inside the space to lift overall sound quality and make monitoring reliable. Soundproofing is about building a physical barrier so external noise stays out and your sessions stay in. They work together, but they solve different problems.
The difference is scope and purpose:
- Acoustic treatment is about shaping how sound waves behave inside a room. Panels, bass traps, and diffusers change reflections, reduce echoes, and smooth the frequency response so what you hear is accurate. It never stops sound leaving or entering the room.
- Soundproofing (isolation) is essentially noise control and stopping sound between spaces. It adds mass, airtight seals, and decoupling (like mass-loaded vinyl or floating floors) to block external noise from entering and to prevent sound energy escaping.
Treatment = control inside. Soundproofing = barrier outside. They complement but are not interchangeable.
In practice, treatment targets first reflection points, the ceiling cloud, and the corners so the room reports the truth at the listening position. Isolation targets the structure. Mass-loaded vinyl between drywall layers, acoustic underlayment under floors, solid-core doors, and sealed penetrations form a continuous physical barrier for noise control.
If your issue is translation, imaging, or unwanted room colour, treat the room. If your issue is neighbours, traffic, or bleed, isolate the room.
Start with layout and monitoring
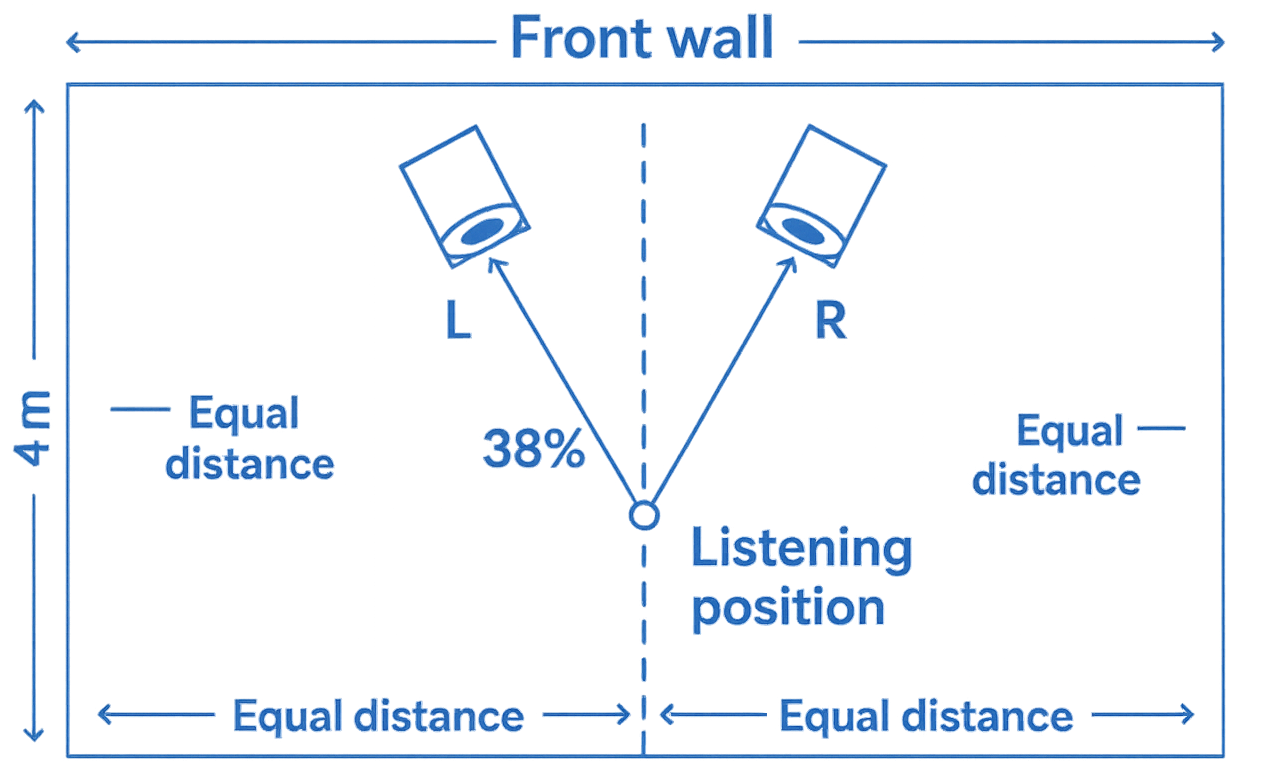
Place the desk on the short wall so speakers fire along the longest dimension of the room. Set the chair about 38 percent of the length as a sensible start, then nudge forward or back until the low end steadies and the sweet spot locks.
Build an equilateral triangle with the speakers and your head, keep tweeters at ear height, and protect symmetry so phantom centre stays welded. Keep the screen low and the desk a modest size because a hard surface can throw early glare.
The aim is simple: strengthen direct sound, quieten the strongest first bounces, and set up the mixing position for wins before a single panel goes up.
Diagnose the room

Listen first. Claps expose flutter echoes between parallel boundaries, while a gentle sine sweep reveals where notes bloom or vanish. Those lumps and holes are clues to standing waves and room modes that bend truth at the chair.
Optional tools like REW confirm the peaks, dips, and reverberation time across bands. In small rooms with high ceilings the decay often hangs longer than you want, so a cloud sits near the top of the list. If you work in classrooms, restaurants, or open offices, speech can smear when many voices compete, so plan for intelligibility as well as tone. Map the worst corners, mark reflection points, and decide which surfaces create the most problematic reflections.
Place core treatments in the right spots

Early reflections decide how well you can localise, so treat them first. Sit at the chair, slide a hand mirror along each wall, and note the reflection points where you can see the speaker cones. Hang broadband panels there to stop sound reflections from blurring transients.
Add a ceiling cloud above the desk because lightweight ceiling panels reduce excessive reverberation and keep imaging stable. Load the vertical corners with bass traps from floor to ceiling so porous depth can turn acoustic energy into heat. Leave air gaps behind deep modules because that extra distance lets them reach further into low frequencies. If the front wall is close, place absorption behind the monitors to calm early slap.
For the rear wall, choose thick absorption when you sit near it, or use diffusion when you have room to breathe so diffusion scatters the return in different directions and preserves life without obvious echoes.
Choose materials and thickness that work
You do not need exotic parts to achieve acoustic quality. Mineral wool or rockwool inside timber frames performs across bands when you pick sensible density and thickness.
A common path is 100 millimetres for side treatment and the cloud, then 150 to 300 millimetres for corners and the rear wall. Acoustic foam still has a job. It is used in recording studios to trap sound at high frequencies, tidy edges, and reduce echoes around vocal setups, but it will not fix the low end.
Diffusers earn their keep when made from rigid materials such as wood and laid out in patterns of various sizes, heights, and surface directions. Place them where diffusers break strong returns without spitting bright slap at the chair.
Treatments arrive in multiple types, fabrics, and veneers, which means you can align acoustic properties with the look you want. Done well, acoustic treatments enhance the aesthetic appeal and can be customised to match the decor of a space rather than fight it.
Use diffusion in small rooms with care
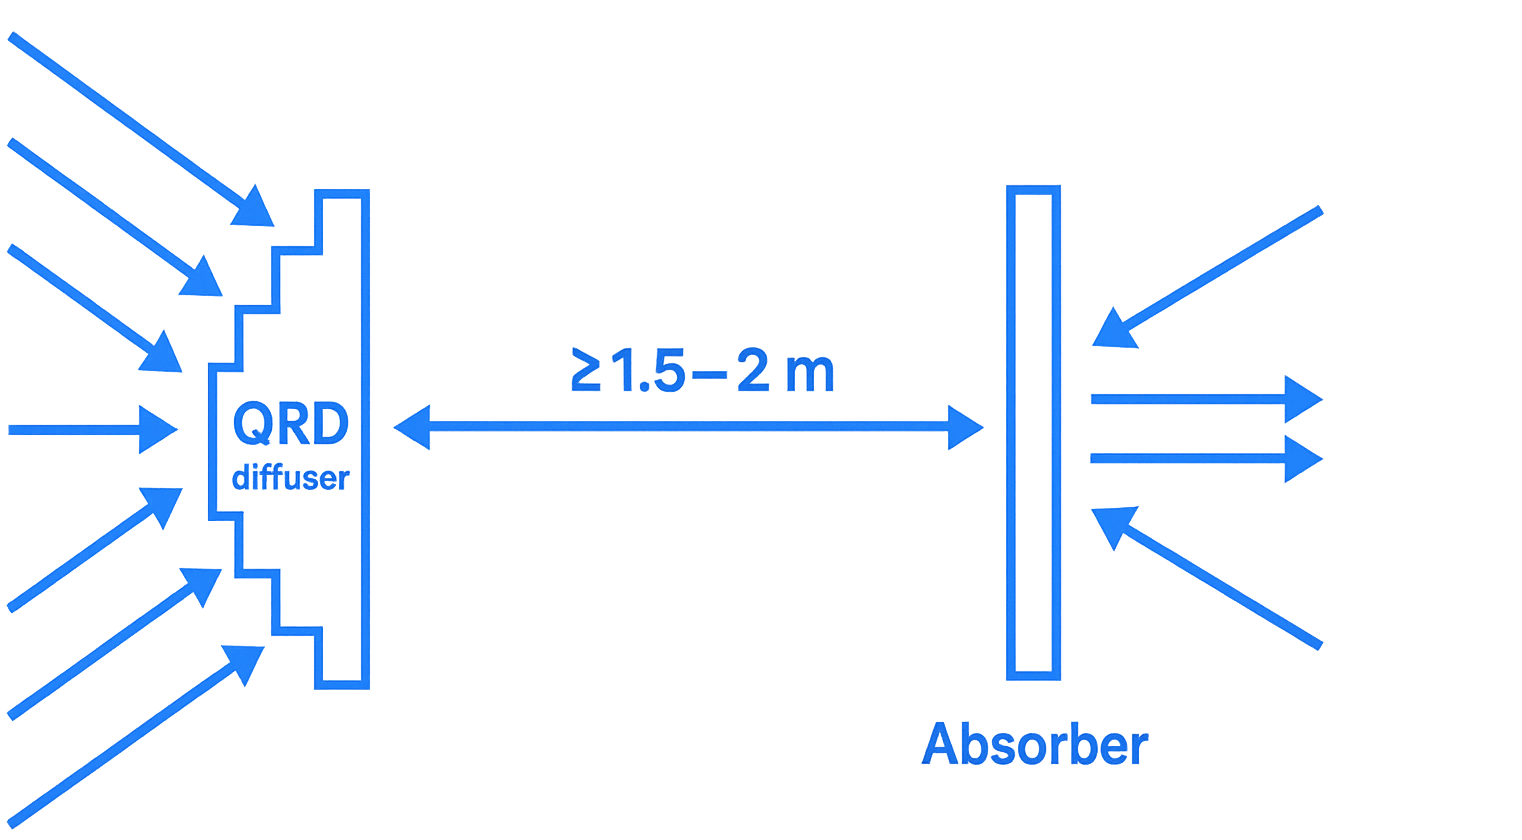
Diffusion rewards distance. In cramped spaces the listening position often sits too close for large arrays to behave as designed, so prioritise absorption first. When the layout allows, a shallow hybrid on the rear wall keeps the room lively while avoiding unwanted resonances.
Skyline and QRD arrays can shine in deeper rooms where diffusion scatters energy without ringing. The rule is simple. Place diffusion where it sends energy away from the seat into safe paths and where different directions of travel do not build a harsh sheen.
Track vocals in a treated room
A tiny booth is rarely the hero in a flat. A better vocal booth alternative is a dry zone you build with thick panels behind and above the singer. Aim the mic so the capsule sees treatment, choose a cardioid pattern, and manage proximity effect by holding a consistent distance.
Angle the pop filter a touch so a hard surface reflection does not zip back through the grille. Keep headphone levels sensible so headphone bleed stays out of the take. When the room no longer colours the source, you capture clean recording that sits without fighting other parts.
Optional digital correction
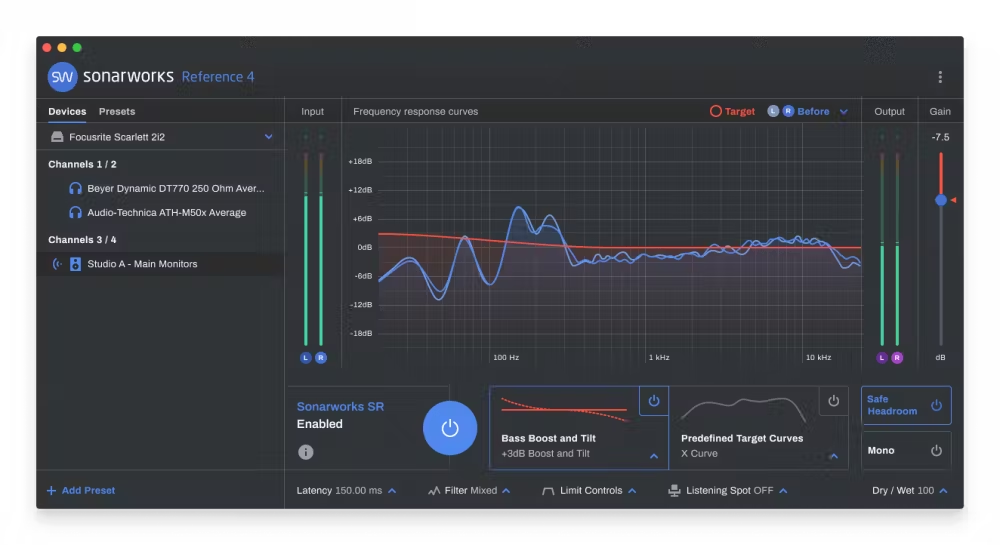
Use calibration as finish, not foundation. Once placement and panels are set, measure, apply a gentle target, and trim only the leftovers.
Tools like Sonarworks or ARC can tidy narrow ripples and deliver more accurate sound without heavy lifting. They cannot erase nulls from standing waves or fix time smearing. Treat first. Correct lightly. That order protects headroom and keeps choices honest.
Budget steps that work
You can move in stages and still make progress. With a tight budget, build two side panels, a simple cloud, and place compact wedges to reduce echoes while you plan deeper traps. With more room in the budget, scale to six broadband panels, add safer fixings for the ceiling, and install large corner units that actually move the needle.
A fuller package adds four serious corner traps and a thick rear wall array so the bottom end stops wandering. Across all tiers, aim for the right balance between control and life so music still breathes.
Why this sequence holds up
The logic is linear. Placement strengthens direct sound and gives you a steady centre. Early treatment blocks the first arrivals that cause comb filtering, so panning and reverb tails are easy to judge.
Corner units tame the longest and most powerful waves, which is why low frequencies are the most difficult to control and why corners matter. A smart rear wall prevents sound energy from bouncing straight back at the seat. By the time you measure, you are chasing small gains rather than firefighting.
Everyday spaces beyond studios
The same moves help gaming rooms, classrooms, and home theatres. In open-plan offices, strategically placed treatment improves speech intelligibility and reduces fatigue.
Restaurants gain clarity when reflective surfaces near diners give way to fabric, wood, or discreet panels. In classrooms and conference rooms, well placed clouds and wall treatment make voices carry without strain. Bare walls in untreated rooms allow echoes to smear consonants, while a single hard surface floor can tip the tonal balance toward glare. If you must keep the build light, try various materials in smaller doses and watch how the space responds.
Materials, looks, and practicality
Good rooms rarely look improvised. Choose panels that suit the wall colour, pick timber trims that match the desk, and keep fixings tidy so the space feels deliberate. You can build with many forms and still keep cohesion if you think in bands.
Soft fibre for high frequencies, thicker cores with air gaps for lows, hybrids where you want character, and select diffusion where the distance supports it. The gear will thank you, but more importantly, you will hear decisions settle faster because the room is no longer arguing back.
Measurable targets
Aim for a smoother frequency response through the mids and a steady decay that feels tight rather than clinical. Watch how the kick and bass join without a hole, how reverb tails read clearly, and how you can hear tiny fader moves without leaning forward.
When you reach that point, you are working at the optimum possible sound quality that the space and budget allow, and your mixes leave the room without surprises.
Conclusion
Treat the room in a sensible order and the guesswork fades. Get the layout right, tame early reflections, and add deep trapping, and those unwanted frequencies stop steering your choices. If the space still feels busy, look beyond EQ. Tackle external noise with isolation where needed and use noise control at the source so the room stays honest.
Finish with light calibration and regular checks against references. You will hear small moves clearly, print mixes that travel, and enjoy a workspace that supports real progress day after day.
Experience world-class recording studios
-p-2000.jpg)
At TYX Recording Studios in London, excellence comes from more than gear. Our studios are purpose-built with professional acoustic treatment, silent monitoring, and world-class equipment. From music to podcasts, we've worked with some of the biggest names across industries.
Book a session and work with world-class engineers to bring your project to life.
Frequently Asked Questions
Acoustic treatment means shaping the sound inside a room. It uses panels, bass traps, and diffusers to control reflections, tame reverb, and smooth out problem frequencies. The goal is better clarity and imaging, not blocking outside noise.
Start with the first reflection points on the side walls and ceiling. Add bass traps in the front corners from floor to ceiling. Treat the rear wall with thick absorption if you sit close to it, or with diffusion if you have enough space. Keep everything balanced left to right.
The 38% rule suggests placing your listening position about 38% of the way back from the front wall. It’s a useful starting point, but not a guarantee; shift forward or back and measure until the low end evens out.
True soundproofing means blocking transmission. For an existing room, add mass and seal every gap: double drywall with damping compound, solid-core doors with seals, acoustic caulk, and vent treatment. If possible, decouple walls with resilient channels or isolated framing. Foam and curtains won’t stop noise.
Position your speakers and chair first, symmetrical, in a triangle, with tweeters at ear height. Treat the first reflection points with broadband panels and hang a ceiling cloud. Load the corners with deep bass traps. Once the room is physically treated, measure the response and apply gentle digital correction if needed.
Absolutely. All our studios are fully soundproofed and acoustically optimised to provide a distraction-free environment for professional audio production. This ensures clarity and precision during your live streaming sessions
We are open 24/7 to members, 9am-9pm for non members. If you need to book irregular hours please contact us directly by phone or through our web form.
.jpg)
.jpg)